Wednesday, July 27, 2011

The Amy Butler Bag is DONE!!!!!!

It is finally DONE! 
The Amy Butler Messenger Bag!  


The outer closure

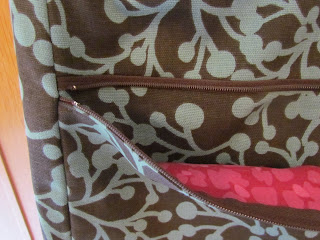
The front pockets and zipper pocket on the front flap


The front pockets are lined in pink


This is the back of the bag and below you can see the back zippered pocket up close


Here is the inside of the bag...plenty big enough for a laptop and notebook

Here is the cool tool pocket incorporated into the finished bag

Look how roomy it is 


It is a really neat bag when done...lots of complicated parts, but very detailed when done.  I have to say I am glad to be done with this one!  :)  Now on to something easier, not quite so mind boggling!  

Tuesday, July 26, 2011

The tool pocket...

This is one of the neatest parts of this bag...the interior tool pocket


It has four pencil spots and one larger pocket

The outer shell is done!

Here is the exterior of the bag....

 this picture shows the zipper pocket on the inside of the front flap...

This is a close up of the zipper pocket...

On to the lining!

Monday, July 25, 2011

The bag is beginning to come together...


Here are the front and back main panels with lined pockets...check out the pictures!  


I used a fun pink lining on these outer pockets...I thought it look great with the teal in the outer fabric.  

Hopefully I will have more time later to continue to sew, but for now...laundry, cleaning, etc.  Never ending jobs!  

Wednesday, July 20, 2011

The next step!

Well, the fabric is cut, and the canvas is attached to the outer fabric for the bag...It is time to begin sewing!  


Each canvas piece had to be individually sewn onto the outer pieces of fabric.  Then the seam allowances had to be trimmed off of each piece in order to reduce the bulk in the corners and places where multiple layers of fabric over lap.  It will be fun to actually start sewing the bag together!  

Amy Butler's Messenger Bag...

Well, I said I would never make this bag again, but here I go.  It is a custom order for a friend so how could I say, No?  


So far, I have spent 3 hours cutting the fabric out for the bag.  All the pieces must be labeled because there are so many of them.  The outside fabric is a duck cloth, or canvas type fabric, the lining is a regular cotton, and then there is a canvas layer used as interfacing on all of the outer bag pieces.  The canvas layer is to add strength and stability and it will not show once the bag is made.  There 5 zippered pockets, along with a pencil pocket type gadget on the inside.  It is really a cool bag, it just takes a long time to make!  Here are pictures of the fabric all cut out...  I will post the progress!


This is the outside fabric, it is a duck cloth almost like canvas.

The light colored fabric on the far right of the photo is the canvas interfacing.  It will not show when the bag is complete.  It is just used to add shape and stability.  

This is the lining fabric...the pink will be used as accents in a few of the pockets.

canvas interfacing...I used some extra I had laying around because it won't show anyway.

I have to label all of the pieces otherwise they would get all confused!  It is like a big puzzle!


Friday, July 15, 2011

Epic Fail!


Ok, this was an epic fail at trying to make a man bag...I tried to be all smart and make an interior zipper compartment...it is there, hard to see in the picture, though.  I used interfacing, etc. to make the zipper compartment tough.  However, the dimensions of the bag were not well thought out.  I made it too deep and not wide enough at the top.  It is impossible to utilize the zipper compartment in the bag.  Ugh.  I will have to re-do it!  The idea is good, just need to make some modifications.  I will re-use the cool Ducks Unlimited clips, but will probably have to trash the zippers...too hard to get back out.  Well, back to the drawing board for the man bag.

Oh, one other thing I learned.  It is almost impossible to sew on sticky waterproof camo material.  I tried to sew the bag out of that type of fabric first.  No luck!  The stickiness prevented the foot feed on the machine to take in the fabric.  Needless to say it was not pretty.  So, I went to a canvas type material next.  Much easier to work with.  I will keep you updated as to what ever happens with this project!  I will figure it out!

Thursday, July 14, 2011

My First Etsy Order!


Here are pictures of the cute little pouches I just sold on Etsy...My first order!  Yea!  Oh, by the way, I forgot to mention the order was placed by my sister...Ha!  

Sunday, July 10, 2011

Funny story, so my sister's husband went fishing with his buddies and borrowed a darling wristlet I had given my sister.  He used the quite feminine wristlet to stick his phone and car keys in so they wouldn't get lost out on the boat.  At first his buddies teased him, then they were asking if they could put their phones in the cute wristlet too!  Ha!  My next task is to create a man bag for outdoorsmen that will hold phones, keys, chap stick, etc.  I am thinking I will make it in camo material, maybe waterproof, with a big clip on it to attach it to a belt, four wheeler or boat.  What do you think?  

Saturday, July 9, 2011


Here is the latest Bagley Bag...this is a new pattern that was fun to make.  I love the flap and adjustable strap.